Auto Deletion Program: User Manual
About the program:
The Auto Deletion program allows the user to delete files in a directory based on
criteria set by the user. Some examples of these criteria are which files to keep, the type
of files to delete, and the deletion of all files that are over a certain number of days old.
The user can save all the settings in a save file so the program can be run automatically at
predefined intervals without user interaction.
Overview:
Figure 1 shows main screen of the program when it starts running.
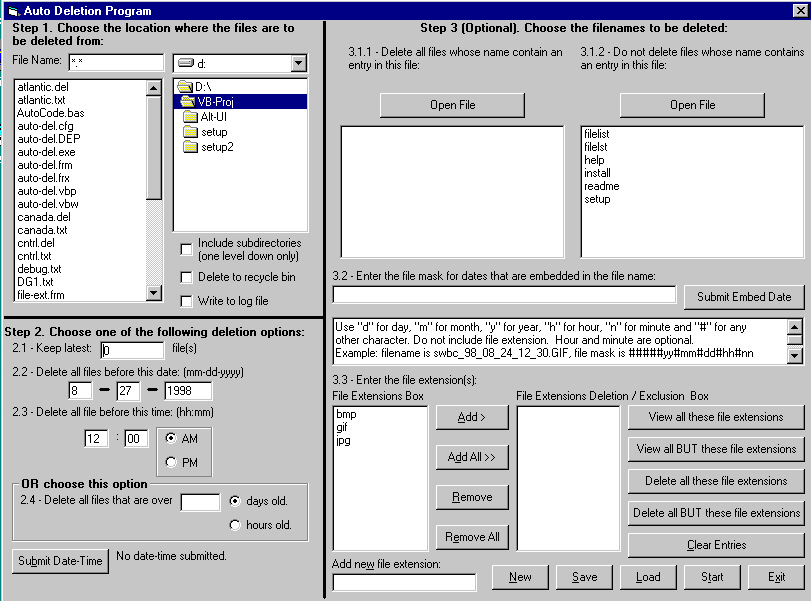
Figure 1. Main screen of Auto Deletion program.
Before Auto Deletion program can start deleting files, the program requires the
directory that holds the files to be deleted and the deletion time to be entered. The
followings sections outlines the various criteria one can set to specify which files should
be deleted. All settings can be changed by submitting new information. Auto Deletion program
will not delete files that are being used by another application at the same time.
Basic Options:
To select the directory where the files are to be deleted, open the directory in the
directory box. Auto Delete will not delete files if the path is the same as the application
path. If Auto Delete is running by itself, then the application path is the directory where
Auto Delete program is kept. If Auto Delete is running under NTCron, then the application
directory is the system or system32 subdirectory of the Windows directoryUse the File
Name box to select only those types of files you want to be displayed and deleted.
Check the Include Subdirectory check box to delete files in the subdirectories.
However, files in the subdirectory of subdirectory will not be deleted. To keep some of the
newest files, enter the number of newest files you want to keep in the How many newest
files to Keep box. The default value is 0, which means all files, except system,
hidden and read-only files, in the directory will be deleted.
Checking the Delete to recycle bin check box will mean that files will be put into
the recycle bin, instead of being deleted permanently. To keep a record of what files are
deleted, check the Write to log file check box. The log file is placed in the directory
where the files are deleted. The name of the log is the date and time when the files are
deleted. Each subdirectory will have its own log file.
To delete all files before a date, enter that date into the date and time boxes and then
press Submit Date-Time button. The caption underneath the button will change to show
the date and time you submitted. Alternatively, to delete all files that are over a certain
number of days or hours old, enter a relative deletion time such as 6 in the text box in the
OR frame and then select the appropriate option box. Afterwards, click on the
Submit Date-Time button and the caption below the button will be update to show
information entered. The relative time is subtracted from the current time to get the actual
deletion time. So if the current time is July 3, 1998 12:40 PM, and the relative deletion
time is 6 hours, then the actual deletion time is July 3, 1998 6:40 AM and all files that
has earlier file date and time will be deleted. If the relative deletion time information is
saved in a save file and the program is run at later time, then the actual deletion time is
calculated using the time when the program is run. Therefore, when relative deletion time is
used, the actual deletion time depends on the time when the program is run. If the absolute
deletion time is used, then the actual deletion time stays constant, regardless of when the
program is run.
When a number is entered in the text box in the OR frame, the date and time entry
boxes will be disabled because currently the program does not support using both absolute
and relative deletion time. To delete all files created 2 days before July 3, 1998 1:00 PM,
the explicit time of July 1, 1998 1:00 PM has to be entered into the date and time boxes.
Also, the program only allows the use of days or hours for relative time, not both days and
hours. So the program can delete all files that are over 3 days old or 3 hours old, but not
3 days and 3 hours old. To change the deletion time or the type of deletion time used,
simply enter the new information and click the Submit Date-Time button.
File Name Mask Option:
Normally, the system date for the file is used when determining if the file should be
deleted or not. However, if the date and time for the file is embedded in the file name like
image1_98_07_23_11_45_Sector1.JPG, then a file mask can be entered to extract the file date
and time. The extracted file date and time can then be used to determine if the file should
be deleted or not. Use the "#" for characters that does not represent the date. The
character "y" is used for year, "m" for month, "d" for day, "h" for hour and "n" for minutes.
So in the example file name above, the file mask would be #######yy#mm#dd#hh#nn. Everything
after the last character that represent the date and time can be ignored and not entered in
the file mask. So, in the example above, the characters in "_Sector1.JPG" are ignored and
not entered in the file mask. Entering the extra characters will not affect the way the
program extracts the date and time from the file name. The time part such as 11:45 is
optional and can be ignored if it is not important. However, the year, the month and the day
are all required. The year can be 4 digits or 2 digits in the file name. If the year is 2
digits, then the century is determined by the current century of the system date as reported
by the operating system. So if the year in the file name is 02 and the operating system
reports the current century as 2000, then the year extracted is 2002. However, if the
operating system reports the current century as 1900, then the year extracted is 1902. Also,
the month, day, hour and minutes must be two digits. Full name or abbreviations for months
like January or Jan are not allowed. As well, the hours and minutes must be in 24 hours
format because there is no special characters in the file mask to designate AM and PM in the
file name. For example, file names like Image1_98_1_2_3_4PM.JPG, or Image1_98_Jan_2_3_4PM.JPG
would be invalid. Instead, the file name should be Image1_98_01_02_15_04.JPG.
File Extensions Option:
The file extension boxes at the bottom of the form allow you to specify the types of
files that the Auto-Deletion program will or will not delete. Type the file extension in the
New file extension box and then press enter to add a new file extension to the
File Extensions Box. To submit a list of file extensions, highlight the ones you want
to add, click the Add button to add those file extensions to the File Extensions
Deletion / Exclusion Box. If you want the program to only delete files with these
extensions and ignore all other file types, then click the Only Delete file with
these extensions button. If you wish the program to delete all files except those files
belonging to the file types you specified, then click the Don't delete file with these
extensions button.
To modify the array of file extensions already submitted, first click the appropriate
view button to list the array. Then add and remove the entries in the array and click on the
appropriate submit button to submit it again. When the program prompts you with the dialog
box stating an array of file extensions already exists, select the first option where it
says to delete the old array and make new array.

Figure 2. File filtering array already exist dialog box.
To remove the delete extension array without entering any new data, click the
View file extensions that will be deleted button and add the entries to the ignore
array by clicking the Don't delete files with these extensions button. To delete the
ignore array without entering any new data, you must click on the New button and
start a new session. This is because currently the program does not allow you to enter an
array containing no entries.
Normally, only one array of file extensions will be entered, either to be deleted or
ignored by the program. If you enter an array of file extensions to be deleted, then all
other file types not in the array will not be deleted. Similarly, if you enter an array of
file extensions to be ignored by the program, then program will delete all other file types
not specified in the array. However, it is possible to enter both an array of file
extensions for the program to delete, and another array for the program to ignore. In that
case, the program will ignore all file types that are not in the delete file extensions
array, regardless of whether the file types is specified in the ignore array or not. So if
the delete file extensions array has the extensions bmp and gif and the ignore array has jpg,
html and htm, then only those files whose extension is bmp or gif will be deleted. All other
file types will be ignored. If a file extension is specified in both arrays, then files of
that type will be ignored because the ignore array has precedence over the delete array.
For example, if the extension bmp is specified in both delete, and ignore arrays, then all
bmp files will not be deleted.
File Name Options:
To add entries to the delete or the do not delete array, open the text
file that contains the file names. There must be only one file name or word per line and
no wildcard characters like * or ? are allowed. The program will delete or ignore a file
if its file name, including the file extension, contains an item in the delete or ignore
array. For example, to delete all files that has tmp in its file name or as its file
extension, make a text file contain the word tmp on a line and then import that text file
into the delete file name array. When the program is run, file with names like tmp00001.txt
or test1.tmp will be deleted. The interaction between delete and ignore arrays are the same
as the file extensions' delete or ignore arrays. To delete either the delete file names
array or the ignore file names array, you must close the window and click the New
button on the main form to start a new session. The data in the text files are not saved
to the autodel save file when you choose save. Instead, the location of the file holding
the data is saved in the save file. When the save file is loaded, the program looks for the
file holding the file name filtering data and attempts to load the file. If that file that
does not exist, then the program will not function as you might expect it to.
The save file names box will probably has some entries in it already when the program
first starts. Those entries are loaded from the auto-del.cfg file and the auto-del.cfg file
can be edited with a simple text editor. These default file name filters are always used when
checking if a file should be deleted or not. If you do not want to use these file name
filters, then delete them from the auto-del.cfg file.
If both file name masking and file extension masking for deletion or ignore are
entered, a file only has to satisfy conditions in one type of masking. So if the delete
file name masking has temp, and delete file extension masking has bmp in it, then files like
temp.txt and drawing1.bmp will both be deleted.
Running Program Automatically:
Before the program can be run automatically, you must save the necessary information
like directory and deletion date using the program's save function. To run the program
automatically, you need to specify the Auto-Delete save files (*.del) as an argument in the
command line. For example, if the save file job1.del and the auto-del.exe file are both in
C:\Auto-Del, then the command line to run the program can be auto-del job1.del or
auto-del c:\Auto-Del\job1.del. If the save file is not in the same directory as
auto-del.exe, then the full path to the save file must be specified.
To run the program at predefined intervals, you can either use a batch file or
applications like NTCrond that can run programs automatically at a predefined schedule.
When running Auto Delete program under NTCron, make sure to include
the path to both the auto-del.exe and the record file. So if both auto-del.exe and job1.del
are both in c:\auto-del, then the command line would be
d:\auto-del\auto-del.exe d:\auto-del\job1.del.
This page has been accessed:

since March 3, 1999